| Organizing Website Navigation |
Well organized content makes your visitors feel comfortable when navigating your website. It helps them to find what they want to know and give them a clear understanding of what you do. In Comdev Web Builder 2.0, the Content Page tool lets you organize your site information structure using tree menu navigation.
This tutorial will show you how to create the navigation of your content pages in multiple tree level. To edit the content for the created page, please follow the tutorials Managing Website Content Pages.
|
Creating A Page
|
1. To create a new page, click on the Content Page icon on your left. The Manage Pages page will appear by default. (Figure 1)
2. The left column shows a Page List which consists of all the pages in your website. On the right, you can fill in the appropriate information to create a new blank page. (Figure 2)
|

Figure 1 Going to Manage Pages section
|
|

Figure 2 Web Page building interface
|
3. Let us start by creating a new page. First, choose the Location of either Main Menu or Side Menu.
4. Enter the Page Title. (Figure 3)
5. Choose the type of the page that you are creating in Create As. The description of the options are as below.
| Fields |
Description |
| Main Page |
A page that contains the primary content for a section. (Top-level title) |
| Sub Page of |
A page under a Main Page. (Subtitle of top-level title) |
| Label |
A label(page title) displayed in menu, without any content and link functionality. |
| Not In Menu Page |
A page with content but does not show in the menu, other page is linkable to it. |
| URL |
Link to external/internal URL |
6. Choose the page Sequence.
7. Click on the Create button once you are done. You will find the created page shows up in the Page List. (Figure 4)
|

Figure 3 Give your page a title
|
|
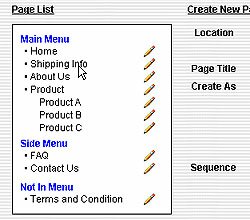
Figure 4 The finished result
|
|
Editing a Page Title
|
1. You can change the position of the created pages in the Page List.
2. Move your mouse over the page title that you want to edit in the Page List (not the  icon) and click on it. (Figure 5) icon) and click on it. (Figure 5)
3. You will be able to re-allocate the page position now. (Figure 6)
|
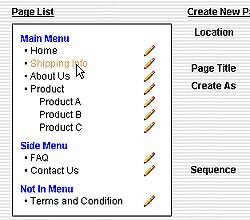
Figure 5 Editing a title
|
|
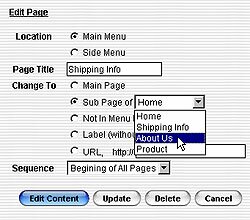
Figure 6 Changing the options
|
4. Choose Update to update the changes, Delete to delete the page or Cancel to return to creating a new page. (Figure 7)
5. To edit the content of the page, you can click on the Edit Content button or the icon in the Page List. You will be brought to a WYSIWYG content editor for you to input the content. (Figure 8)
|
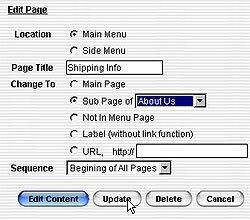
Figure 7 Updating the page title
|
|
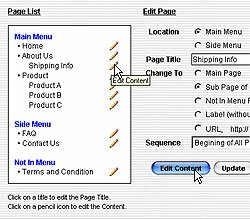
Figure 8 Add / edit content
|
Conclusion
The Content Page tool is useful for you to define your website structure and let you reorganize your information with ease. It is recommended that you to create the entire site structure first before proceeding to input the content for each page. We wish this tutorial can be much helpful to you.
For more tips and tutorials on how to edit the content pages or related topics, please read:
|
|

|
|
|
 |
Browse By Archieve |
|
|
|
|
 |
Web Builder 2.0
|
|
How to...
Build a Web site with Comdev Web Builder 2.0 |
|
e-Business
|
|
Web site development, increase sales, globalization, customer service |
|
Email
|
|
Outlook Express, create new address, administration, virus, attachment |
|
Graphics
|
|
Image editing, scanning, digital camera |
|
Marketing
|
|
Online marketing, search engine, ezine, banner ads, spam mail |
|
|
|
 |
Search Archieve |
|
|
|
|
|
|


