This is a complete tutorial for CSV Importer Back-End. After this tutorial, you'll be able to manage your records including add, edit and delete records, retrieve records from database and set your preferences. Also, proceed to Administrator Section tutorial to learn about settings and information, create One Admin user account and installation.
User Login
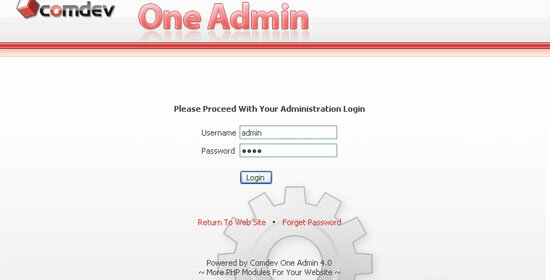 |
- To proceed with your 'Administration Login', browse the URL to your 'Oneadmin' folder, for example 'http://your_domain_name.com/oneadmin/'.
- Enter your username and password, and Click 'Login'. Click 'Return To Web Site' if you wish to return to the main page of your domain or click 'Forget Password' to retrieve your password.
|
Import > Load CSV File
 |
- Save your spreadsheet you've done in Microsoft Excel or other programs in CSV format before you start to import them to your database. (eg. datasample.csv)
- You must prepare your data columns similar to your MySQL table. For any column with date, use 'YYYY-MM-DD' format. Make sure that any column bearing primary key does not have repeated values.
- There are four stages in CSV import. First stage is to upload your CSV file. To begin, browse your file, separate columns with comma or other symbols and define number of records to preview. Click 'Upload'.
- After you've upload to your server, you're able to preview your CSV data. Click 'View All Columns' to view all records.
- Click 'Next' to proceed to the second step which is 'Connect Database'.
|
Import > Connect To Database
 |
- Next, you need to connect to your MySQL database. Enter your 'MySQL Host', 'Username', 'Password' and click 'Connect'.
- Select a 'Database' and 'Table' you wish to import your CSV data into the table itself.
- You're able to preview the table you've selected. Click 'View All Columns' to view all records.
- Click 'Next' to proceed to the third step which is 'Match Column'.
|
Import > Match Columns
 |
- The third step is to match existing table columns with your CSV file columns to confirm all the columns are matched with one another.
- The wizard will let you preview both your CSV file and selected table. Click 'View All Columns' to compare details from both popup windows.
- Check option to 'Import First Record Line in your CSV file'. This line normally consists of columns names.
- There are 3 options to choose from whether you want to 'Append As New Record', 'Replace All Records' or 'Update Records Using Primary Key'
- Choose 'Append As New Record' to add in records, and check option to use 'Auto Increment Value for Primary Key Column' in the CSV file.
- Choose 'Replace All Records' to remove all existing data in your table and replace with new one.
- Choose 'Update Records Using Primary Key' will recognize column bearing primary key to do the data update.
- Click 'Next' to proceed to the last step.
|
Finish Import
 |
- Upon completion, the wizard will give you a summarized details for the whole process. A copy of your old data will be backup for undo purpose.
- Finally, click below links to view all records you've imported, undo the import process or go to 'CSV Export' feature.
- Click 'OK' to exit import task.
|
Undo Import Process
 |
- Click 'Undo Import' on top to undo the import process and restore your original data.
- A page shows last imported information, such as date, time, database and table name. Also, it lets you preview the last import table (current existing table) and the backup copy (original data before import).
- Click 'Undo Last Import' and your backup data will be restored.
|
Export Your Data
 |
- You can export data from your database to CSV file. To begin, click 'CSV Export' navigation link.
- On the CSV Export page, enter your MySQL Host, Username and Password. Click 'Connect' to your MySQL database.
- Select a Database from the drop down list, followed by selecting a Table. Then, select columns to export. Select none to export all of them.
- Finally, preview your data in the selected table. Click 'View all columns' to view in a pop up window. The table that you wish to export will be converted to CSV file format automatically.
- Click 'Export' to proceed with download and save file.
|
|
Back to the top
|
|
|
| • |
Risk Free Trial |
| • |
Free Installation |
| • |
Cost Saving Discount |
| • |
24/7 Secure Ordering |

|
"Congratulations on the great comdev site and products."
- Bernardo Pires Brazil
|
|
