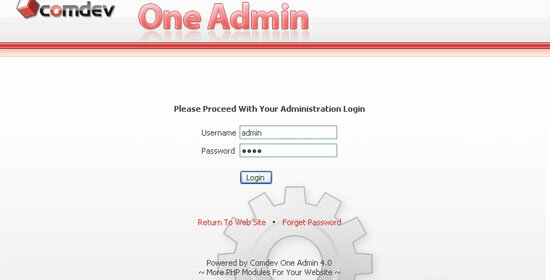
To proceed with your 'Administration Login', browse for the path to your 'Oneadmin' folder, for example 'http://your_domain_name.com/oneadmin/'.
Enter your username and password, and Click 'Login'. Click 'Return To Web Site' if you wish to return to the main page of your domain or click 'Forget Password' to retrieve your password.
After you've login to your administration area, click on the eCommerce Catalog icon located on your left.
To add a product to your online catalog, go to the Product link > Add Product.
Choose the product category. Enter the product code if any. We recommend you to use product code for the ease of tracking all your customers' orders.
Browse the Main Category and select a category of the product from the pull down menu. Select Additional Category if you wish to display the same product under different category as well.
Browse for the product's thumbnail photo (smaller sized image) and the recommended width is between 120 to 200 pixels. Browse for the enlarged product photo (larger sized image) and the width is between 300 to 500 pixels.
Enter your product prices. Enter the brief description for your product. If you wish to have more detailed description, you can use the HTML editor to enter its additional information, even with some design and additional photos and screen shots about the product.
Customize the quantity in stock and minimum order amount of the product if necessary. Check the box if the product is new.
Check the featured product to display on your web page. Click Show to display product on your web page.
Select the Recommended Category of the product from the pull down menu to recommend user other products with similar product nature.
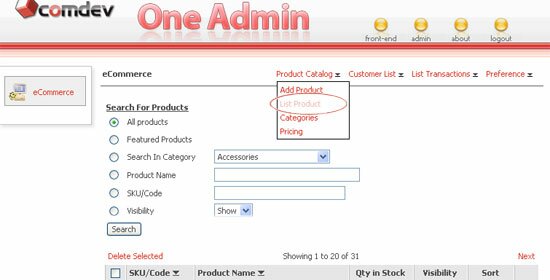
To view all your products in your online catalog, go to the Product link > List Product. You can shorten the list results by perform search. Click one of the search option to search by category, product name or product code and click Search.
You can define the sequence of the products to be displayed on your web page. Sorting is applicable for products under the same category. (Note : System will select product to display randomly based on your preferable setting)
To edit a product, click on the icon. You will be able to see the product details similar to Add Product form. Just update your product information and click on the Update button. Click Next to edit the following items.
If you wish to cancel, click Back. You can delete a product from the Edit Product page itself or delete multiple item in the List Product page. Just click on the checkbox beside each record, and click on Delete Selected.
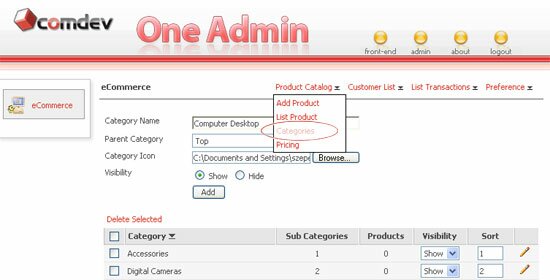
To add category for various products, go to the Product link > Categories.
Enter the new Category Name. Choose a Parent Category and browse the location of the category icon if any. Click on the radio button for either show or hide the category.
Click on the Add button.
Define the sequence of the category accordingly.
You can always set the visibility from show to hide or vice versa
For editing, click on the icon. Make changes on the info and click Update.
If you wish to cancel, click Back. You can delete a product from the Edit Product page itself or delete multiple item in the List Product page. Just click on the checkbox beside each record, and click on Delete Selected.
Go to the Product link > Pricing, to manage your products prices. There are 2 price groups named 'Normal' and 'Promotion' are created by default.
Create a new price group, for eg. Sales. Check the box below the text field to allow public to view this price. Then click Add.
To Edit price group, click the icon corresponds to the record you want to edit. Make changes on the record and click Update. Otherwise click Back to cancel editing or click Delete to remove record.
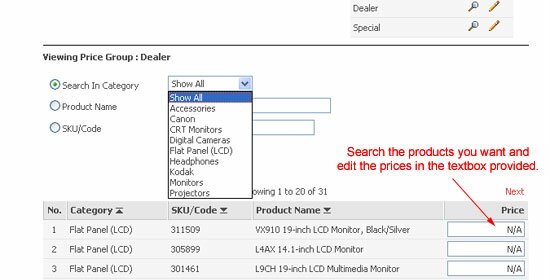
To view record details, click on the icon in the list. A list of products will display along with prices. To shorten the list, you can search either by category, product name or product code. Then click Search.
From the search result, you can update the price for each item in the textbox provided. If you wish to delete the price, just put N/A or 0.00. When you are done, click on the Update Prices button.
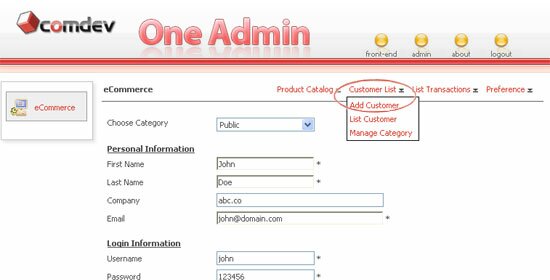
To add a customer, go to the Customer link > Add Customer. To begin, choose a category to place the customer under a specific group. Enter his/her personal info, create user login info. for accessing Product Pricing page(s) and select the account status as Active.
Enter the billing address and shipping address of your customer.
To view all your customers, go to the Customer link > click List Customer. You can shorten the list results base on the category or search by first name. Click on the or to sort the list in descending or ascending order.
Click on the icon to edit customer records. Click Update to save changes. If you wish to cancel editing, click Back.
To delete, you can either delete records from the Edit page itself. To delete multiple records, go back to the Customer List, check the box of whichever record you want to delete and click Delete Selected.
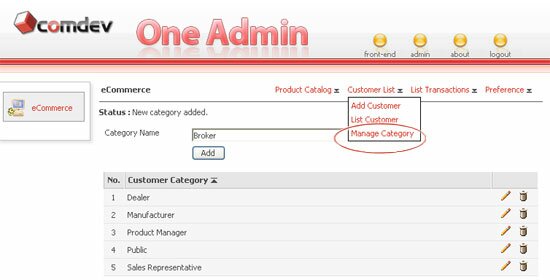
To add category, go to the Customer link > Manage Category. Enter a new Category Name and click on the Add button.
Click the or icon to sort list. Click the icon to edit a category. Edit the category and click Update to commit changes.
If you wish to cancel editing, click Back. To remove record, click Delete right away on the same Edit page. To delete multiple records, go back to the category list and delete selected records.
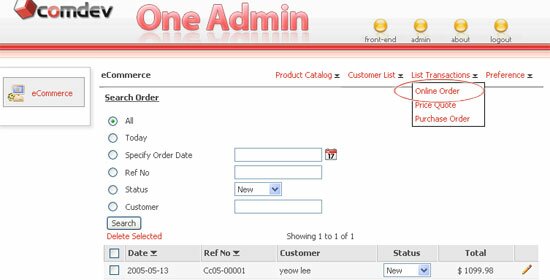
Above screenshot shows how the eCommerce transaction carry out. Upon checkout, your customer are given three options to select from to complete their payment.
Customer can choose either to pay by Credit Card or wish to Request For Quotation or send Purchase Order. Once they've completed the process, you will receive a copy of ordered request.
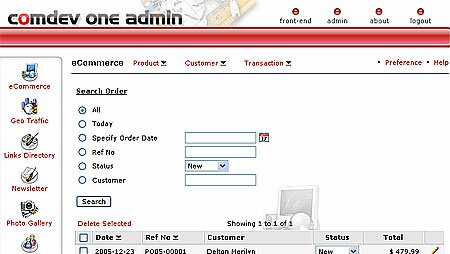
As we mentioned above, there are 3 types of payments that your customer can choose from. To view orders, go to Transaction link and select either Online Order, Price Quote or Purchase Order to view customer orders.
Click one of the search option and click Search. All customers orders will populate in the list below. Click Update List to get updated order list.
Click on the or icon to sort list in ascending or descending order.
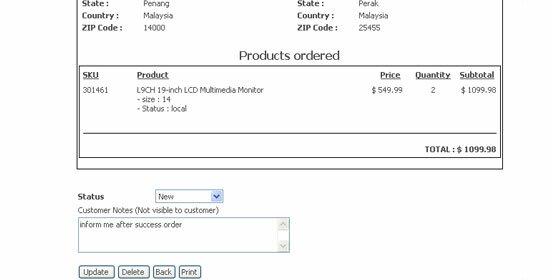
You can set order status either it is a New order, or it has been Replied, Shipped or Closed. To edit records, simply click the icon. (Note: The Edit page will be shown below)
You can view order records of the customer. You may not modify the existing data but you can still alter the order status, PO number and other info. which are alterable. Click Update to commit changes.
For Additional Instructions such as banking details, terms of payment, etc. can be customized in the Preference setting page.
If you wish to print this Purchase Order, click Print PO button at the bottom. Click Back to return to the list if you wish to cancel editing. To delete order, you can either delete on the Edit page itself or go back to the order list to delete multiple order.
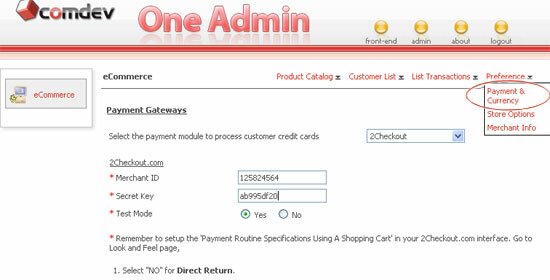
Click on the Preference link. You will see the Payment & Currency page. This is where you choose the online payment processor to process your customer credit cards.
Select an ideal and reliable processor from the pull down menu. After you select, you'll need to enter your identity for your login account and also complete some data entries. Follow the instructions for each payment modules.
Proceed to the Currency section to define the currency you want to use for your store. Once you've completed, click on the Save button. Click Use Default to get back the original settings.
(Note: Please scroll down for following Preference setting of Store Options and Merchant Info.)
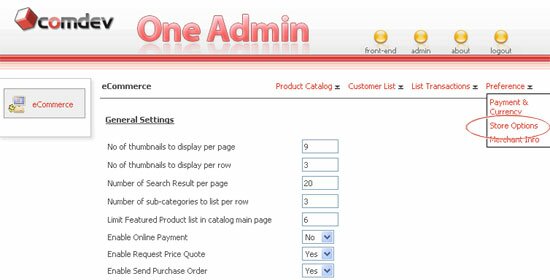
Store Options
On the same page, click Store Options to configure the General Settings, define Image Size, set the display setting of Product Details Page and personalize the Email Copy to send for customer.
Click Save.
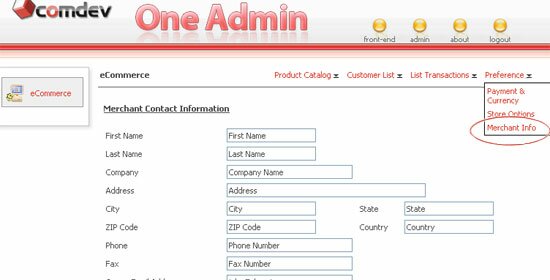
Merchant Info
Click on the Merchant Info under the Preference setting. Enter the merchant contact info. who provides you the services to process your customer online payments.
You may write the Additional Instructions about the Price Quote and Purchase Order for your customers, such as banking details, terms of payment, etc. This notes will display at the bottom of every Price Quote and Purchase Order.

 icon. You will be able to see the product details similar to Add Product form. Just update your product information and click on the Update button. Click Next to edit the following items.
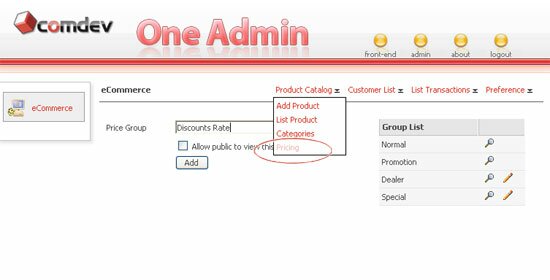
 icon in the list. A list of products will display along with prices. To shorten the list, you can search either by category, product name or product code. Then click Search.
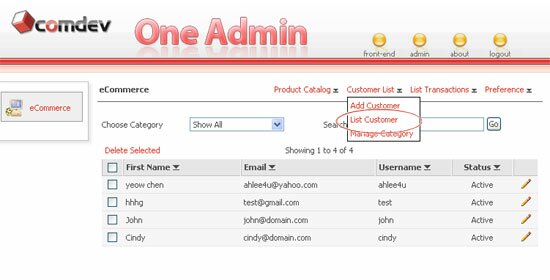
 or
or  to sort the list in descending or ascending order.