First, browse to the URL of your back-end system for e.g. ' http://domain-name.com/oneadmin/ '
Then, proceed with your Administration Login using your username and password otherwise click on Return To Web Site or Forget Password.
|
 |
- After you've login to your admin area, proceed to your Photo Gallery or click on 'Admin' > 'Installation' if your Photo Gallery has yet to be installed.
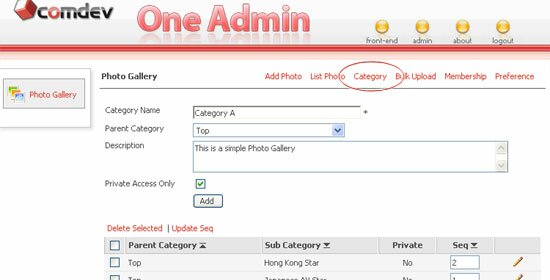
- Next, click on 'Category' to create various categories to organise your photos.
- Enter your Category Name, and select a Parent Category from the dropdown menu. You can create it as sub-category or a new category.
- Enter a short Description about your category and check the 'Private Access Only' option to restrict others from accessing your category. Click on Add button once you're done.
- Every category will have its own [ID] number which is used to call specific categories in your website after integration. Click on
 or or  icon to sort categories in ascending or descending order. icon to sort categories in ascending or descending order.
- Re-arrange the sequence for every category in the list. Click on
 icon to edit records and easily delete selected categories in a mouse click away. icon to edit records and easily delete selected categories in a mouse click away.
|
 |
- Click on 'Manage Photo' > 'Add Photo' in order to insert photos into your gallery. Choose a Category to locate your photo, and enter a Photo Title.
- Define the Publish Date in YYYY-MM-DD format. By default, it displays today's date. Enter photo's description in brief and in detail. Also, enter the Author name of the photo.
- Thumbnail Photo - browse to your JPEG or GIF photo and upload it. Thumbnail size is ranging between (140W x 110H pixels) to (160W x 118H pixels).
- Leave textbox blanks if you select Auto Thumbnail Creation. (Note: Upload GIF photo when using GD 2.0, and JPEG photo when using GD 1.6, 2.0 or above).
- Enlarged Photo - browse to your enlarged photo in JPEG or GIF format and upload it.
(Note: Upload GIF photo when using GD 2.0, and upload JPEG photo when using GD 1.6, 2.0 or above).
- Select Auto Resize Photo to resize your photo automatically and select Add Copyright Text to display copyright text on your photo.
- Add Watermark - select this option to add watermark and it must be PNG file format and with GD 2.0 or above. (Note: Watermark is only apply to JPEG photos and with GD 2.0 or above).
- Additional File Download - browse to your Zip file contains images in enabling your visitors to download.
- Enter the total number of hits, set photo as New, and enable Show Photo to display your photo in your front-end. Subsequently, click on Add button.
|
| |
Click here to read more about GD library.
|
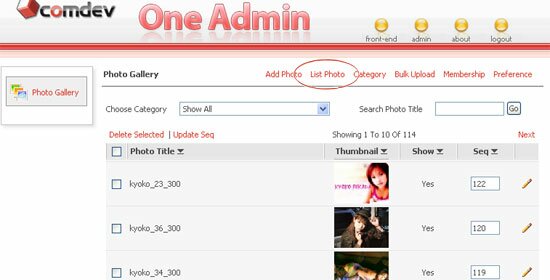 |
- Click on 'Manage Photo' > 'List Photo' to list out your entire photos. Choose Category from the dropdown menu or search by Photo Title.
- To sort photo in ascending or descending order, click on icon. Re-arrange the photos sequence at your preference. Select Show to display respective photo in your front-end and set photos as 'New'.
- Click on each thumbnail to view enlarged photo and click on Next or Previous on your top right to navigate easily. Remove selected photos in just a click away and edit records by clicking on icon.
|
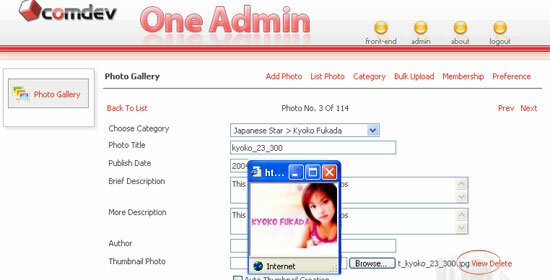 |
- Upon clicking on the icon in the 'List Photo' page, a page similar to above will let you edit or delete particular photo.
- You can update name, re-select category and options, modify info and view visitor comments.
- To change your photo, click on 'View' to view thumbnail or enlarged photo before delete or you can delete it right away.
- Now, browse to your new photo. If you check Auto Thumbnail Creation, do not browse to your thumbnail photo because a thumbnail will be generated for you automatically.
- Browse to your 'Enlarged Photo' and select Auto Resize Photo, Add Copyright Text and Add Watermark options. (Note: Watermark must be in PNG file format with GD 2.0 and it's only apply to JPEG photos with GD 2.0 or above).
(Note: Your thumbnail and enlarged photo can be in GIF file format with GD 2.0, or JPEG with GD 1.6, 2.0 or above)
- It is optional to show or hide your photo, set photo as new and view hits (show how many visitor views your photo). Once done, just click 'Update'.
- To edit following records, easily click on Next or Previous on your top right and click on Delete button to remove record.
|
 |
- Write a comment for a particular photo to allow your visitors to review. Enter a name of the person who give comments. Select Date Post, and enter comment in the textarea.
- Set status as Active to display in your front-end. Click on Add button once you're done. Also, manage and update comments with relative ease.
|
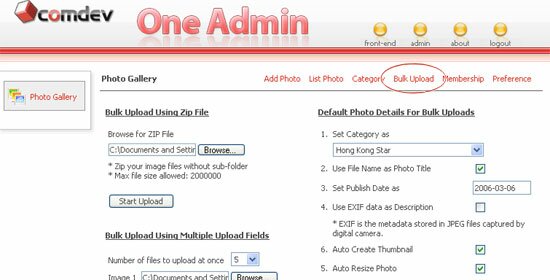 |
Bulk Upload Using Zip File |
- Before you start uploading your photos in bulk, personalise your bulk uploads settings.
- Select 'Set Category as' to locate your photos in a specific group. Select 'Use File Name as Photo Title' if you want to, set Publish Date in YYYY-MM-DD format or use default date.
- It's optional for you to 'Use EXIF' data as 'Description'. (Note : EXIF is the metadata stored in JPEG files captured by digital camera). Also, Set Photo Status As New if you want to.
- Enable 'Auto Create Thumbnail' to create a thumbnail automatically in your front-end. Meanwhile, enable 'Auto Resize Photo' to display your enlarged photos using your preferable size.
- Enable 'Add Copyright Text' to display copyright text on your uploaded images and enable 'Add Watermark' to display watermark on your pictures. (Note : Watermark must be in PNG file format with GD 2.0 and it's only apply to JPEG photos with GD 2.0 or above ).
- Now, you can start to upload your Zip file.
- Click on the 'Start Upload' button and a window will prompt to you. Browse to your Zip file and upload it. (Note: Make sure that your zip file consists only images, without any sub-folders.).
|

|
Bulk Upload Via FTP |
- Using a FTP program, upload your photos to the web server directory, for e.g. 'oneadmin/_files/photo_ftp'.
(Note: Make sure that there is no sub-folder in the 'oneadmin/_files/photogallery_ftp' directory).
- Next, personalise the "Settings For Bulk Uploads" section.
- Select 'Set Category as' to locate your photos in a specific group. Select 'Use File Name as Photo Title' if you want to, set Publish Date in YYYY-MM-DD format or use default date.
- It's optional for you to 'Use EXIF' data as 'Description'. (Note : EXIF is the metadata stored in JPEG files captured by digital camera). Also, Set Photo Status As New if you want to.
- Enable 'Auto Create Thumbnail' to create a thumbnail automatically in your front-end. Meanwhile, enable 'Auto Resize Photo' to display your enlarged photos using your preferable size.
- Enable 'Add Copyright Text' to display copyright text on your uploaded images and enable 'Add Watermark' to display watermark on your pictures. (Note : The watermark image must be in PNG file format with GD 2.0 and it's only apply to JPEG photos with GD 2.0 or above).
- After you've finished the settings, click on Start button to complete your bulk uploading.
|
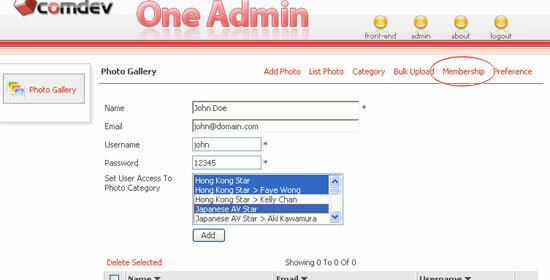 |
- Click on 'Membership' to add members info and login accounts. Enter member's Name, Email, Username and Password.
- Choose category from the dropdown menu to assign users with permission to access selected category(ies). Click on 'Add' button once you're done.
- To sort photo in ascending or descending order, click on icon. Easily remove selected record(s) and click on to edit member's info.
|
 |
- Click on Approval to view and approve/reject photos and comments posted by visitors. You will see two separate tables with Pending Photos and Pending Comments.
- Set Status as Pending or Approve in the list and set photos as New if you want to. Click on
 icon to view and edit photos info. Meanwhile, you can edit visitors comments when you click on icon. icon to view and edit photos info. Meanwhile, you can edit visitors comments when you click on icon.
- Click on Update once you're done. Easily remove selected record(s) in a click away.
|
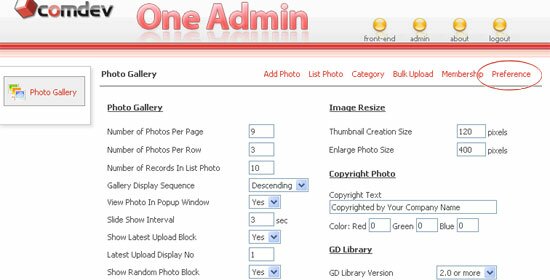 |
- Admin & Front-End Settings - Define Number of Photos Per Page, Number of Photos Per Row, Number of Records In List Photo, Latest Upload Display No, Random Photo Display No, Number of Sub Category Per Row, Number of Comment Display, etc.
- Slide Show Interval - Enter interval period in second.
- Optional Features - View Photo In Popup Window, Show Random Photo Block, Enable Photo Rating, Enable Visitor Comment, Enable Slide Show, Enable Members Login, etc.
- Front-End URL - Define the URL of your domain to display photo gallery in your website.
- Enable Captcha Image - Display random text image verification in your photo submission form. (Note : Requires both the GD library with FreeType support).
- Enable Static URL (Search Engine Friendly) - Run online pages in static URLs and it can be applied on apache server with mod_rewrite enabled.
- Photo Details Page - Select how you want to display your photo details page. You can either 'Use Side Details Style' or 'Use Bottom Details Style'
- Image Resize - Define Thumbnail Creation Size and Enlarge Photo Size in pixels.
- GD Library - Select GD Library Version. (Note : GD library is required for Thumbnail Creation, Auto Resize, and Copyright Text. Please check your PHP Info. GIF format is now supported on GD 2.0.28 and above).
- Photo Copyright Text - Enter copyright text to be displayed on your photos and define the color codes for Red, Green and Blue.
- Watermark Settings - Select your watermark location from a dropdown menu, and browse to your watermark icon. (Note : Your watermark image must be in PNG file format with GD 2.0 and it's only apply to JPEG photos with GD 2.0 or above).
|
 |
- Admin Email - Enter a recipient address where all emails will be sent to this address.
- Notification Email Upon New Photo Submission - Email admin when users submit photos if you enable Require Admin Approval option. Personalise email subject and message.
- Notification Email Upon Post New Comment - Email admin when users post new comments if you enable Require Admin Approval option. Personalise email subject and message.
- Forget Password Email - Email users when they request for password. Personalise email subject and content.
(Note : Please do not remove or edit all the variables placed within the [[ ]] brackets).
|
 |
Click on 'Preference > Integration Guides' to read about how to integrate Photo Gallery to your website. |
|
|
| • |
Risk Free Trial |
| • |
Free Installation |
| • |
Cost Saving Discount |
| • |
24/7 Secure Ordering |

|
"Thank you for your help with this so far. Your applications are exactly what I've been looking for for some time now: the ability to slot the functionality of the application transparently into an existing site template using includes rather than having to modify an existing template is just what the doctor ordered!!"
- Nathan Nelson, http://www.spikydog.com
|
|